Sometimes You’ve Just Got To Kick It Into Gear.
Yep, as you may have gathered, it’s just one of those days. No matter what you do, it’s just one of those days when your hair won’t sit right, and you cannot…to save your soul, do things like fill your brows evenly or blend your blush perfectly, or even conceal that blasted monthly hormonal horror which is sitting so high up on your chin you might just have to give it a name. Well, it happens to the best of us. Not much more to this post than that. My commiserations.
My best suggestion for you today is just kick it into gear, hold your head up high, and channel the abundance of inner beauty that is lying below the naughty hair, misbehaving skin, and mojo-less makeup, and rock it like you mean it! Why? Because you ARE beautiful!
If You’re Going To Walk The Walk…
You’ve got to talk the talk! (in the most good humoured way of course) I got the best email asking about the terms I used in yesterday’s post O’l Blue Eyes. When I replied to the email, I asked if I could share a bit of the email as the question asked may have also been on the minds of a few of you lovely lasses as well. Plus, it was too good not to share. Our gorgeous Beauty Marked! reader agreed:
“What on earth is the inner V and, well, outer V for that matter? Also, which crease do I apply the eyeshadow to? I seem to have a few creases as I suspect my eyes might be a bit older than yours.”
Well, beautiful one, the terms you asked about from yesterday’s post all refer to areas of makeup placement on the eye.
Crease = The fold just above your top eyelid that is visible when your eyes are open. Applying eyeshadow to this crease area can add definition to your eyes. Mind you, some Asian beauties may not have a visible crease on their eye lids, but only the continuation of the eyelid up to the brow area and won’t really have a need for added definition here, in any case. Remember that dark colours give the illusion that the area it’s used on is moving back or receding, therefore making everything lighter in colour more pronounced. Hence the use of light colours will have the opposite effect making that area more noticeable.
Outer V= The area of your outer upper eyelid that can be drawn like a figurative side lying V between your upper lashline and the outer edge of the crease area of your eye. The pointy bottom section of the V lies in the direction of your ears. The same rules of dark and light also apply here in regards to definition too. The Outer V is also a great place for a small pop of gorgy colour if you’re feeling a bit adventurous.
Inner V= This is the area of the eye where the top and bottom lashlines meet. This area also makes a figurative side lying V, where the base of the V is pointing towards the bridge of the nose. The Inner V is absolutely a divine place to drop a bit of highlighting colour. Often a shimmery opalescent , pale gold, or pearly colour used in the Inner V will give you a beautiful, much sought after, wide awake twinkle.
So there you go, a brief rundown of a few makeup terms used to describe the real estate of the eye. But honestly, terms like that inner eye bit, the…um…bendy/curvy/foldy section and that upper outer eye area work good enough for me too. Wink.
What are some of the makeup terms you use?
Ol’ Blue Eyes…

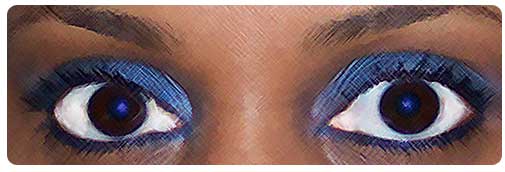
A bit sketchy I know. *Boom. Tish.* What? My eyes are old and it is a sketch. Sorry, I couldn’t help myself. The other day, I sported an absurdly blue eye that won me tons of complements. I thought I’d share the gorgeous bits and bobs I used to create this crazy blue eye. I felt a million bucks and I’m pretty sure these blue eyes are why.
Shu Uemura Drawing Pencil 03 ME Blue to water and tight lines top and bottom.
Stila Smudge Pot in Cobalt Shimmer as base to top lid.
Stila Powder Eyeshadow in Azur to set Smudge Pot on top lid.
The Body Shop Eye Shimmer 07 in Indigo to crease, outer V and inner V.
Shu Uemura Eyelash Curler to top lashes.
Diorshow Unlimited 090 mascara (black) to top and bottom lashes.
BECCA Brow Powder in Medium to eyebrows.
*sings* (badly)
I did it… myyyyyyyyyyy wayyyyyyyyyy!
Never Underestimate The Power…
Of a great red lipstick! What’s so great about a fabulous red lipstick? It’s not its emollient base, its brand or its long lasting capabilities, but its ability to be a powerfully amazing confidence boost. Since our relationship with all things beauty is really about harnessing the abundance of inner beauty that lay within us and displaying it through our gorgeous exterior. Why keep your beauty a secret? Go on, grab that great red lipstick, put it on, and go forth and spread beauty and light.
You’re beautiful!
Cream Blush Anyone?
Fancy a cream blush, but don’t know how to use it? Can’t get it to hang around past a few hours after it’s applied? If you answered yes, yes, and yes then you’d be in the very same situation as many makeup mavens out there. Cream blush can deliver a gorgeous dewy, youthful cheek but can be a tad tricky to apply and to coax into sticking around. Cream blushes are fantastic for skin that is reasonably blemish free and leans more towards normal to dry. Oilier skins can use cream blush, but it takes a little extra work.
As a makeup artist, my preferred way to apply cream blush is to use my thumbs. On others, I just load up one thumb with product (a few swirls on the blush generally suffices) then rub my two thumbs together. Place your wrists together so that your palms are facing each other, then gently touch both thumbs at the same time to the apples of the cheeks. This delivers the exact amount of blush to both cheeks at exactly the same height on the face. I then lightly blend outwards using my fingers along the cheek towards but not right up to the ears. The amount of blush should be most concentrated at the apples and then seamlessly fade off into the faintest amount of colour in the outer direction stopping about 2-3 finger widths from the ears. I use the same technique when I apply blush to myself as well, but instead of putting my wrist together facing palm-ward, I align my pinky fingers with palms facing upwards. Then I blend, blend, blend. If your feeling a little less dextrous, simply use a synthetic foundation brush. It will do the trick nicely too.
To get your cream blush to hang out a bit longer, simply set it with a light dusting of powder. Powder blush of a similar colour (my fave), translucent powder, blotting powder, or powdered foundation will all work well. Just remember to put liquids, gels and cream based products before powdered. Although not a forgone conclusion entirely, generally moist products applied over dry can tend to cake, bead, or peel, so should be avoided when possible. Lightly powdering over will vastly improve your blush’s colourful existence on your cheek. Admittedly, powdered blush, especially, on top of cream blush seems to amp things up nicely, giving you long lasting colour with extra alluring dimension. Hopefully, these tips will tempt you into trying cream blush as it is certainly one of the more gorgeous, yet under utilized makeup items out there. You’ll be pleased if you show cream blush a bit of love. Do be sure to let us know how you go.
Golden Moonglow.

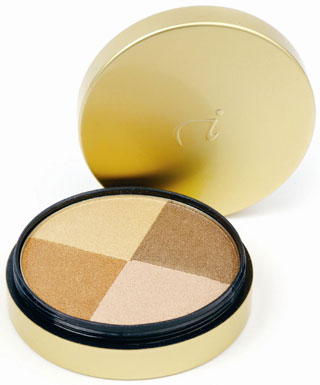
I couldn’t pass up an opportunity to remind you of this ultra-luxe, pressed powder illuminator by Jane Iredale. Moonglow is a rounded quad of golden bronze and copper-toned shades designed to be used individually on eyes, cheeks, and lips, or swirled together as a divine all over bronzer for the face, decollete, shoulders, shins and calves, for starters…Wherever you wish to set aglow.
The finely milled shimmer of Jane Iredale’s Moonglow is made of 24-karat food grade gold flakes. No FD & C dyes or irritants are used in Jane Iredale Products, whatsoever, which is fabulous. Moonglow is easily built up to be as dramatic or as soft and ethereal as you desire. Beauty Marked! wouldn’t be without these four sumptuous, rich shades of sheer golden indulgence!
Out With The Tide…
Just a quick Beauty Public Service Announcement ladies. Please don’t forget to blend your foundation in around the edges of your face, paying particular attention to the jaw-line, tip of the nose and chin area. Some makeup mavens are still getting caught out with visible tide lines. I suspect the prevalence of tide lines has less to do with the correct foundation colour match, but more to do with our busy, often rushed, lives. We are still, occasionally, forgetting to check that our foundations are fully blended in. It’s easily done and it most certainly can happen to the best of us. So just take a brief moment or two to make sure you push your well blended foundation around your jaw-line, just under your chin, up to your ears and hairline. Better yet, only use foundation where you need it and blend, blend, blend!
