Eyebrows: The Most Gorgeous Frame.
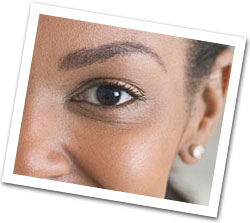
Our eyebrows clearly frame our face and set the tone for our image. This often ignored aspect of the face has such a tremendous influence on our look. Many folks often concentrate on all other areas of their grooming and makeup, but forget about these vital little beauties.
Immaculately groomed and well shaped eyebrows give us a polished look, even when we are wearing no makeup at all. (Fellas, I’m looking at you!) When we have cleared out all the undergrowth that can so quickly accumulate under and between our brows without being noticed and then shape these babies into a full and clean arch, we gain the effect of looking more alert and flatteringly well groomed.
Beauty Marked! recommends that you have your eyebrows professionally shaped at least once in your life. But be warned, once you see the miraculous difference gorgeously shaped brows make, you’ll be hooked!

Cream Blush Anyone?
Fancy a cream blush, but don’t know how to use it? Can’t get it to hang around past a few hours after it’s applied? If you answered yes, yes, and yes then you’d be in the very same situation as many makeup mavens out there. Cream blush can deliver a gorgeous dewy, youthful cheek but can be a tad tricky to apply and to coax into sticking around. Cream blushes are fantastic for skin that is reasonably blemish free and leans more towards normal to dry. Oilier skins can use cream blush, but it takes a little extra work.
As a makeup artist, my preferred way to apply cream blush is to use my thumbs. On others, I just load up one thumb with product (a few swirls on the blush generally suffices) then rub my two thumbs together. Place your wrists together so that your palms are facing each other, then gently touch both thumbs at the same time to the apples of the cheeks. This delivers the exact amount of blush to both cheeks at exactly the same height on the face. I then lightly blend outwards using my fingers along the cheek towards but not right up to the ears. The amount of blush should be most concentrated at the apples and then seamlessly fade off into the faintest amount of colour in the outer direction stopping about 2-3 finger widths from the ears. I use the same technique when I apply blush to myself as well, but instead of putting my wrist together facing palm-ward, I align my pinky fingers with palms facing upwards. Then I blend, blend, blend. If your feeling a little less dextrous, simply use a synthetic foundation brush. It will do the trick nicely too.
To get your cream blush to hang out a bit longer, simply set it with a light dusting of powder. Powder blush of a similar colour (my fave), translucent powder, blotting powder, or powdered foundation will all work well. Just remember to put liquids, gels and cream based products before powdered. Although not a forgone conclusion entirely, generally moist products applied over dry can tend to cake, bead, or peel, so should be avoided when possible. Lightly powdering over will vastly improve your blush’s colourful existence on your cheek. Admittedly, powdered blush, especially, on top of cream blush seems to amp things up nicely, giving you long lasting colour with extra alluring dimension. Hopefully, these tips will tempt you into trying cream blush as it is certainly one of the more gorgeous, yet under utilized makeup items out there. You’ll be pleased if you show cream blush a bit of love. Do be sure to let us know how you go.
Heading Home.

As you can imagine, I personally test darn near everything I write about. For those few products I can’t test but do write about, I, at the very least, have someone I trust test the products for me (like in the case with men’s products or products not specifically suited to my skin type or colour). Other than that, it’s all me. So with the major amounts of Guinea Pig-ing I do, my skin occasionally arcs up and freaks out. I have had allergic reactions or my skin has threatened an outbreak of the most catastrophic kind! It ain’t pretty. So what do I do in the event of those rare but dark times? I head straight home. I go back to basics.
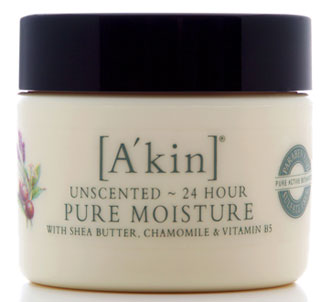
[A’kin] Unscented ~ 24 Hour Pure Moisture with Shea Butter, Chamomile & Vitamin B5 is home for me. As with all [A’kin] products, Pure Moisture is 100% nasties-free. Not a paraben or sulphate to be found! Pure Moisture was designed specifically for sensitive, allergy prone, fragile and damaged skin, that’s been in the proverbial “wars”. This ever so nurturing moisturizer is positively packed with natural soothing actives such as vitamin B5, Vitamin E, and Viper Bugloss oil, which is a highly concentrated source of Omega 3, 6, and 9 essential fatty acids. [A’kin] Unscented ~ 24 Hour Pure Moisture gives me all the pure, safe, organic, and healing warm and fuzzies my skin needs at such times of crisis. Before long, my skin is back on the road again fit to merrily experience and test more beauty bits just for you.
The End Is Nigh.
For your beloved skincare items. Now what? I don’t know about you, but to me, it seems such a colossal waste when you have a product or several products in fact, that will not get used before it’s time for them to give up the ghost. I often find myself in this situation, when I have a beauty product that I adore, so I use only the tinciest amount each application so as to prolong its time in my possession. But what I end up doing, without fail, is miscalculating the realistic daily allotment and end up with tons left when the PAO (see Wednesday’s post) and the commencement of regular sniff testing is just around the corner. It’s ridiculous! Even if the products weren’t suited to you for its original intended use, too oily for your liking, or the wrong texture for your face, for example, perhaps they can be used another way. With a little lateral thinking, it may be possible to salvage that moisturizer, scrub, or mask, and then it won’t seem like such a squander when you have to let it go. Simply reinvent its use.
Just a few of my favourite ways to use up skincare items are as follows:
- use facial exfoliants on the decollete, hands, and the tops of feet.
- use gentle gel cleansers without any chemical exfoliants to cleanse makeup brushes.
- use face cleansers with chemical exfoliants (such as AHA, BHA, SA etc.) as body wash.
- use rich night creams as shaving creams (men can get in on the action with this tip too).
- use face masks on the decollete, hands, and back.
- use moisturizing serums (oil based) as hair glosses.
- use untinted lip balms as hair wax for the bitsy look or to slick down rogue strays.
When In Doubt, Chuck It Out!

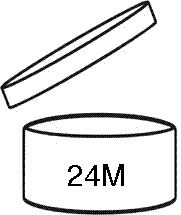
Did you think that today’s post heading only pertained to suspect food in the fridge? Well, the same goes for cream based cosmetics. The nose knows. We have all seen those natty little drawings (PAO symbols) on most cosmetic packaging of a round container with the lid ajar and a number and the letter M (M = months) around it. The varying numeral on the jar states how many months the cosmetic company reckons you can safely use their products once opened before they are meant to “go off”, so to speak and need replacing. I’m not entirely convinced that these stipulated periods of time are wholly accurate, but more a not-so-subtle indicator as to when you should go and *wink* buy more. This most certainly seems the case with dry powder based products, as they can last ages just as pristine as when you first purchased them. But, In all fairness, they must be a somewhat reasonable life span indicator for cream based products, because some cosmetics can certainly turn a bit manky soon after this duration. My suggestion to you is to not only plan to turf cream based items within this time period, but to sniff them every now and again to be sure to be sure. Most oils and waxes within products will definitely “turn” eventually and have a slightly sharp and possibly more rank and or pungent smell to them. Trust me, rank and pungent is never good in cosmetics. Even that smell of something that makes you feel a bit unsure is your cue to place that cosmetic item in the circular file: the bin. When in doubt, chuck it out!
Out With The Tide…
Just a quick Beauty Public Service Announcement ladies. Please don’t forget to blend your foundation in around the edges of your face, paying particular attention to the jaw-line, tip of the nose and chin area. Some makeup mavens are still getting caught out with visible tide lines. I suspect the prevalence of tide lines has less to do with the correct foundation colour match, but more to do with our busy, often rushed, lives. We are still, occasionally, forgetting to check that our foundations are fully blended in. It’s easily done and it most certainly can happen to the best of us. So just take a brief moment or two to make sure you push your well blended foundation around your jaw-line, just under your chin, up to your ears and hairline. Better yet, only use foundation where you need it and blend, blend, blend!
Top Coat. Base Coat. What’s the point?
The point of top and base coats when polishing your nails, is that they not only protect your nails from the varnish you are using, but also help to extend the life of your nail polish. Base and top coats are always required when properly polishing your nails. They are just as necessary as the two coats of colour you paint on. Many companies have built on the basic requirements and uses of base and top coats, that some now clam to dry quicker, entice rapid nail growth, whiten, harden, to be chemical free, and can support MP3s, to boot! But seriously, the most basic essentials of these two requisite coats are:
Base Coat - to smooth the nail surface and to add a colourless protective varnish layer to protect your nail from the colour pigments in nail polishes that can stain (particularly your reds, fuchsias, and darks).
Top Coat - to add shine to your nail polish and to seal in the layers forming a tougher, fade and chip resistant polish.
Beyond that, it’s just a matter of what added optional extras you fancy in a base and top coat.
